How to Paint Kitchen Laminate Cupboards
A Step-by-Step Guide to a Professional Transformation
Is your kitchen feeling dated, but a full renovation isn't in the budget? Painting your laminate or melamine cupboards is one of the most transformative and cost-effective upgrades you can make. It's a project that requires patience and meticulous prep work, but the payoff is huge. However, this isn't like painting a wall. Laminate is a slick, non-porous surface designed to resist things sticking to it – including paint. Skipping the crucial preparation steps will result in a finish that peels and scratches with the slightest knock. Follow this guide to do it the right way for a durable, factory-smooth finish.
The Golden Rule: Preparation is Everything
This is a job where 90% of your time will be spent preparing, and only 10% actually painting. Do not cut corners here.
- Remove Doors and Hardware: For a professional result, you must remove all the doors and drawer fronts. Unscrew all hinges, handles, and knobs. Label each door and its corresponding hinges with a piece of tape (e.g., "Above Sink Left") so you can put them back in the right place.
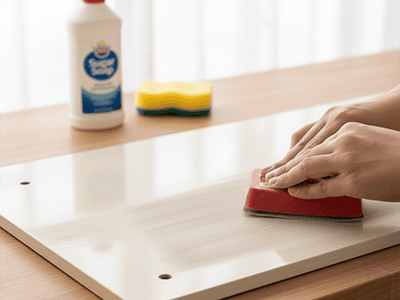
- The Deep Clean: Kitchen cupboards are coated in years of cooking grease, even if they look clean. This is the enemy of paint adhesion. Give every surface – doors, drawer fronts, and the fixed cabinet frames – a heavy-duty clean with Sugar Soap. Pay extra attention to areas around the stove and handles. Rinse with a clean cloth and let everything dry completely.
- Sand for Grip: This is the most important step. Laminate is glossy and slick. You need to "scuff sand" every square centimetre of the surface to create a microscopic texture for the primer to grip onto. Use a 120 or 180-grit sandpaper and sand until the original sheen is gone and the surface feels uniformly dull and slightly rough.
- Wipe Away All Dust: After sanding, the surfaces will be covered in fine dust. Use a tack cloth or a damp microfibre cloth to wipe everything down until it's perfectly clean.
Priming and Painting: The Magic Happens Here
With your surfaces perfectly prepped, it's time to build your new finish. The primer you choose is the key to a long-lasting job.
- Use a Specialist Adhesion Primer: This is non-negotiable. Standard wall primer will not stick to laminate. You need a specific product designed for slick surfaces. Ask at your local paint shop for a "specialist primer for laminate" or an "adhesion primer". Products like Zinsser Bullseye 1-2-3 or Dulux Precision Maximum Strength Adhesion Primer are excellent choices available in Australia.
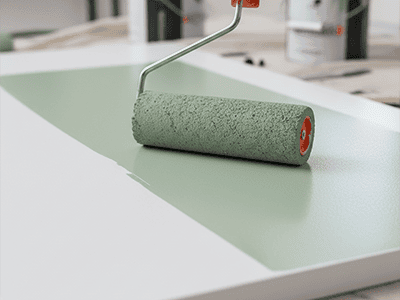
- Apply a Thin, Even Coat of Primer: The best way to get a smooth finish is with a small, high-density foam roller (often called a "flock" roller). It leaves a spray-like finish with no brush marks. Apply one thin, even coat of your adhesion primer to all surfaces and let it dry completely.
- Apply Your Topcoats: Once the primer is dry, it's time for your colour. Use a hard-wearing cabinet or trim paint, like Dulux Aquanamel, in a satin or semi-gloss finish. Apply two thin topcoats with a fresh foam roller, allowing the first coat to dry completely before applying the second. A light sand with very fine (240-grit) sandpaper between coats will give you an even smoother result.
- Cure, Don't Just Dry: This is vital. While the paint may feel dry to the touch in a few hours, it takes several days (up to a week or more) to fully "cure" and harden. Be gentle with your newly painted cupboards during this time to avoid chipping or scratching them. Wait as long as you can before re-installing the doors and hardware.
Pro Tip from a Sydney Painter
Achieving a truly professional, factory-like finish on kitchen cabinets is a specialised skill. We often use professional spray equipment to apply the primer and topcoats, which delivers a perfectly even, flawless finish that is simply not achievable with a roller. It also significantly speeds up the process. If you want a kitchen transformation that is both stunning and incredibly durable, entrusting the job to the experts at DRJ Painting is your best bet.