Giving Old Furniture a New Life
A Beginner's Guide to Furniture Painting
That old timber bookshelf in the garage, the dated bedside tables from a second-hand shop, or the pine dresser that no longer matches your style – every home has a piece of furniture that's structurally sound but aesthetically tired. Before you list it on Gumtree, consider giving it a new life with paint. Furniture painting is an incredibly rewarding and creative DIY project that can transform a piece from drab to designer. With the right prep and paint, you can create a custom piece that perfectly suits your home.
Step 1: The All-Important Preparation
Just like any other painting job, success lies in the prep work. This is especially true for furniture, which has often been waxed, polished, or sealed over the years.

- Clean it Thoroughly: Start by giving the entire piece a good clean with Sugar Soap to remove years of dust, wax, and furniture polish. This is a critical step for paint adhesion. Rinse with a clean, damp cloth and let it dry completely.
- Remove Hardware: Unscrew and remove all knobs, handles, and hinges. It's much easier than trying to paint around them.
- Make Repairs: Fill any dents, deep scratches, or old hardware holes with a wood filler and a putty knife.
- The Essential Scuff Sand: You don't need to strip the furniture back to bare wood. The goal is to "scuff" the old finish. Use a 120 or 180-grit sandpaper to lightly sand every surface you plan to paint. This removes the gloss and creates a fine texture for the primer to grip onto. After sanding, wipe away all the dust with a tack cloth.
Step 2: To Prime, or Not to Prime?
Priming is a crucial step that ensures your paint job looks great and lasts. It stops stains from bleeding through and helps your topcoat stick properly.
- When You MUST Prime: Always prime bare wood, dark stained timber (to prevent bleed-through), or glossy surfaces. A specialist adhesion primer is best for very slick pieces.
- When You MIGHT Skip It: The main exception is if you are using a high-quality "chalk paint." These paints are designed to adhere to most surfaces without a primer, which is why they are so popular with beginners. However, for a truly durable finish, a primer is always recommended.
Step 3: Choosing Your Paint and Applying Your Colour
You have a few great options when it comes to furniture paint, each with a different look and feel.
- Chalk Paint: The go-to for beginners. It's very forgiving, requires minimal prep, and dries to a beautiful, velvety matte finish. It's perfect for creating a rustic or shabby-chic look. You can find excellent Australian brands like Annie Sloan or Porter's Paints.
- Water-Based Enamel (Aquanamel): For a more modern, durable, and cleanable finish, a water-based enamel in a satin or semi-gloss is a fantastic choice. It leaves a harder finish that's great for high-use items like tabletops or chairs.
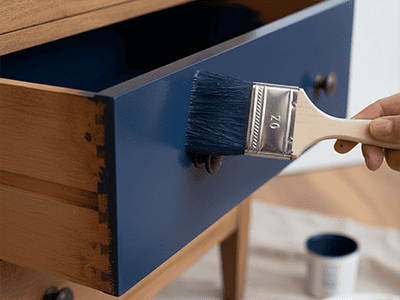
- Application: For large, flat surfaces like a tabletop, a mini foam roller will give you a beautiful, smooth finish. For detailed areas, legs, and corners, a high-quality angled brush is your best tool. Apply two thin coats for the best result.
Step 4: The Protective Topcoat
This final step is non-negotiable, especially for high-use items. A topcoat protects your beautiful paint job from scuffs, scratches, and stains.
- For Chalk Paint: The traditional finish is a soft furniture wax, which is buffed in to create a gentle sheen and protective layer. For more durability on a tabletop, use a water-based clear polyurethane in a matte or satin finish.
- For Enamel Paint: Good quality enamel paints like Aquanamel are self-sealing and don't require a separate topcoat as they cure to a hard, durable finish on their own.
Pro Tip from a Sydney Painter
The key to a professional furniture finish is patience. Rushing the sanding or not allowing proper drying time between coats is where things go wrong. For an absolutely flawless, "like new" look, we often use professional spray equipment. This allows us to apply perfectly thin, even coats of primer and paint that result in a glass-smooth finish with no brush or roller marks. It's the ultimate way to revitalise a beloved piece of furniture. If you have a special piece that deserves a perfect finish, talk to the team at DRJ Painting about our professional furniture refinishing services.