How to Rejuvenate Your Deck or Verandah
A Guide to Preparing and Finishing Timber Decks
In Australia, the deck or verandah is an extension of our living space – a place for barbecues, family gatherings, and relaxing in the sun. But our harsh climate is brutal on timber. The relentless UV rays, driving rain, and foot traffic can quickly turn a beautiful new deck into a grey, weathered, and uninviting surface. Restoring your deck is a labour-intensive but incredibly rewarding project that not only brings it back to life but also provides essential protection, extending its lifespan for years to come.
Phase 1: The All-Important Clean and Prep
This is the most critical and physically demanding part of the entire job. You cannot apply a fresh coating over old, failing finishes, dirt, or mildew. A properly prepared surface is the key to a beautiful and long-lasting result.
- Clear and Sweep: Remove all furniture, pot plants, and barbecues from the deck. Give the entire area a thorough sweep to remove loose leaves and debris.
- Inspect and Repair: Check for any loose boards, protruding nails or screws, or any signs of rot. Hammer in or re-screw any loose fixings and replace any damaged boards.
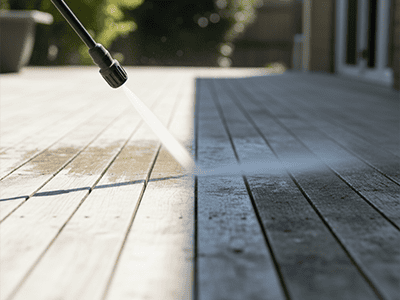
- Strip and Clean: You now need to remove all the old, failing coating and surface grime.
- For Old Stains/Oils: You’ll need a specialised deck cleaner or stripper. Apply it according to the manufacturer's instructions (usually with a stiff-bristled deck brush) to break down the old finish. A pressure washer is then the most effective way to wash it all away.
- For Old Paint: If your deck is painted, you will need to scrape and sand off any and all flaking or peeling paint until you are back to a sound, stable surface.
- The Final Wash: After stripping, a final wash with a deck cleaning product will remove any remaining contaminants and prepare the timber pores to accept the new coating.
- Let it Dry Completely: This is crucial. The timber must be completely bone dry before you apply any coating. This can take at least 2-3 full, warm, sunny days after washing. Applying a coating to damp timber will trap moisture and cause it to fail.
Phase 2: Coating - Stain, Oil, or Paint?
Your choice of finish depends on the look you want and the level of maintenance you're prepared for.
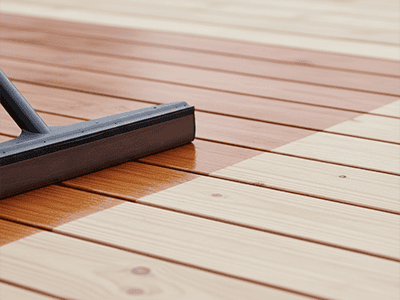
- Decking Oil/Stain (Transparent/Semi-Transparent): This is the most popular choice in Australia as it enhances the natural grain and beauty of the timber.
- Pros: Looks natural, allows the timber grain to show through. Easier to re-coat in the future (usually just a clean and a light sand is needed).
- Cons: Offers less UV protection than solid paint, so it requires more frequent maintenance (typically every 12-18 months).
- Deck Paint (Solid Colour): This provides a solid block of colour, completely hiding the timber grain.
- Pros: Offers the ultimate in UV protection and durability. A great option for older, more damaged decks as it can hide a lot of imperfections. Comes in a huge range of colours.
- Cons: Hides the natural beauty of the wood. Can be more prone to showing scratches. Much more work to prepare for a recoat in the future, as any failing paint must be completely removed.
Application Tips
- Use the Right Applicator: For stains and oils, a wide applicator pad on a long pole is the best tool. It applies a thin, even coat without drips. For paint, a roller with a medium nap is effective.
- Work Along the Grain: Always apply your coating in the same direction as the timber boards. Work on 2-3 boards at a time for their full length to maintain a wet edge and avoid lap marks.
- Don't Paint in Direct Sun: Avoid painting on a hot, sunny day. The coating can dry too quickly, leading to a patchy, uneven finish. The ideal time is on a calm, overcast day or in the morning/late afternoon.
- Apply Two Coats: Two thin coats are always better than one thick coat for both looks and durability.
Pro Tip from a Sydney Painter
The longevity of a deck finish is 100% dependent on the quality of the preparation. We see many DIY jobs fail within a year because the initial stripping and cleaning process wasn't thorough enough. As professionals, we use commercial-grade pressure cleaners and strippers to ensure the timber is perfectly prepared. For a truly professional and long-lasting finish that can stand up to the harsh Sydney sun, trust the experts at DRJ Painting to bring your outdoor living space back to life.