How to Paint Interior Doors
Achieve a Flawless, Factory-Smooth Finish
Interior doors cop a lot of wear and tear. They get scuffed by shoes, marked by fingerprints, and generally take a beating from daily life. A freshly painted door can instantly lift the look of a hallway or room, but it’s also a surface where a poor paint job really stands out. Brush marks, drips, and a rough finish are common DIY mistakes. With a few professional tricks and the right tools, you can achieve that durable, glass-smooth finish that looks like it came straight from the factory.
Preparation: The Key to a Smooth Finish
As with any paint job, 90% of the result comes from the prep work. For a surface that’s seen up close every day, this stage is non-negotiable.
- Take the Door Off the Hinges: While you can paint a door in place, you'll get a much better result by taking it off. Lay it flat across two sawhorses. This prevents paint from running and dripping.
- Remove All Hardware: Unscrew and remove the door handles, latches, and any other hardware. Taping around them is a recipe for a messy finish. Keep all the screws together in a zip-lock bag.
- Clean Thoroughly: Give the entire door a good clean with Sugar Soap and a sponge to remove years of grime and greasy fingerprints, especially around the handle area. Rinse with a clean, damp cloth and let it dry completely.
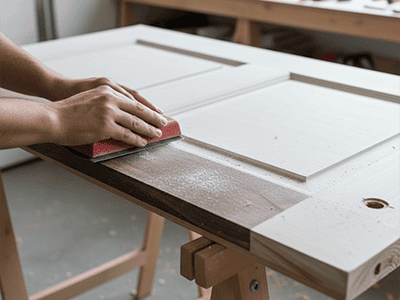
- Sand, Sand, Sand: This is the most crucial step for a smooth finish. Use a 180-grit sandpaper on a sanding block to sand the entire door, including all the grooves on a panelled door. This dulls the old finish and creates a "key" for the new paint to grip onto.
- Wipe Away the Dust: After sanding, use a tack cloth or a slightly damp microfibre cloth to wipe away every speck of dust.
The Professional Painting Sequence
Using the right tools and painting the sections of the door in the correct order is the secret to avoiding ugly brush marks and achieving a seamless finish.
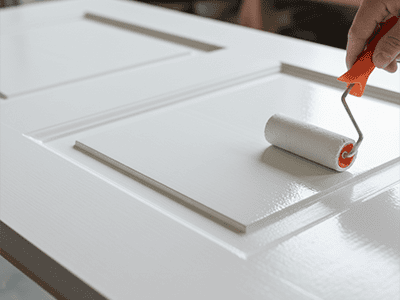
- Choose the Right Tools: For the flat panels, a mini foam roller is your best friend. It leaves a beautiful, spray-like finish with no brush marks. For the detailed grooves and edges (the moulding), you'll need a high-quality 50mm angled brush.
- Select the Right Paint: A durable semi-gloss or satin enamel is the standard choice for doors. Modern water-based enamels from brands like Dulux Aquanamel are excellent – they are tough, easy to clean up, and don't yellow over time like old oil-based paints.
- The Correct Order for a Panelled Door:
- Mouldings: Start by using your brush to paint the detailed mouldings around the panels first.
- Panels: Use your mini foam roller to paint the flat inner panels.
- Centre Stiles: Next, roll the vertical sections (stiles) down the centre of the door.
- Rails: Then, roll the horizontal sections (rails).
- Outer Stiles: Finally, roll the two outer vertical stiles, from top to bottom.
This sequence allows you to always maintain a wet edge and work from the inside out, ensuring a smooth, blended finish. Always apply two thin, even coats, allowing the first to dry completely before lightly sanding and applying the second.
Pro Tip from a Sydney Painter
The biggest enemy of a smooth door finish is dust. We always ensure our work area is spotless before we even think about opening a can of paint. For the ultimate factory finish, many professionals will use a paint sprayer, which delivers a perfectly even coat with zero texture. It’s a specialised technique that requires skill and the right equipment. For a guaranteed flawless finish on all your doors and trim, the team at DRJ Painting has the tools and expertise to deliver stunning results.